Introduction to Red Velvet Cake
Why is Red Velvet Cake so beloved?
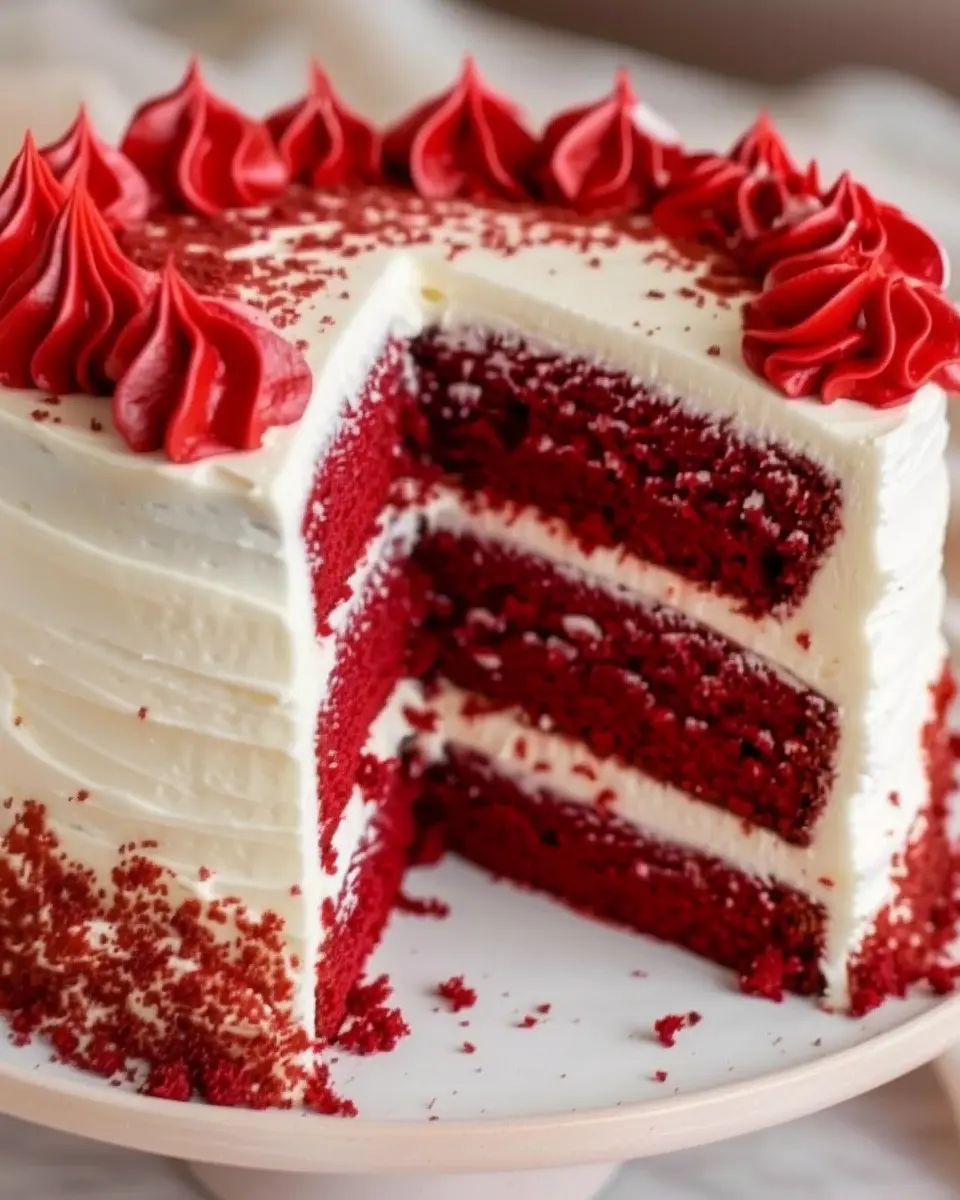
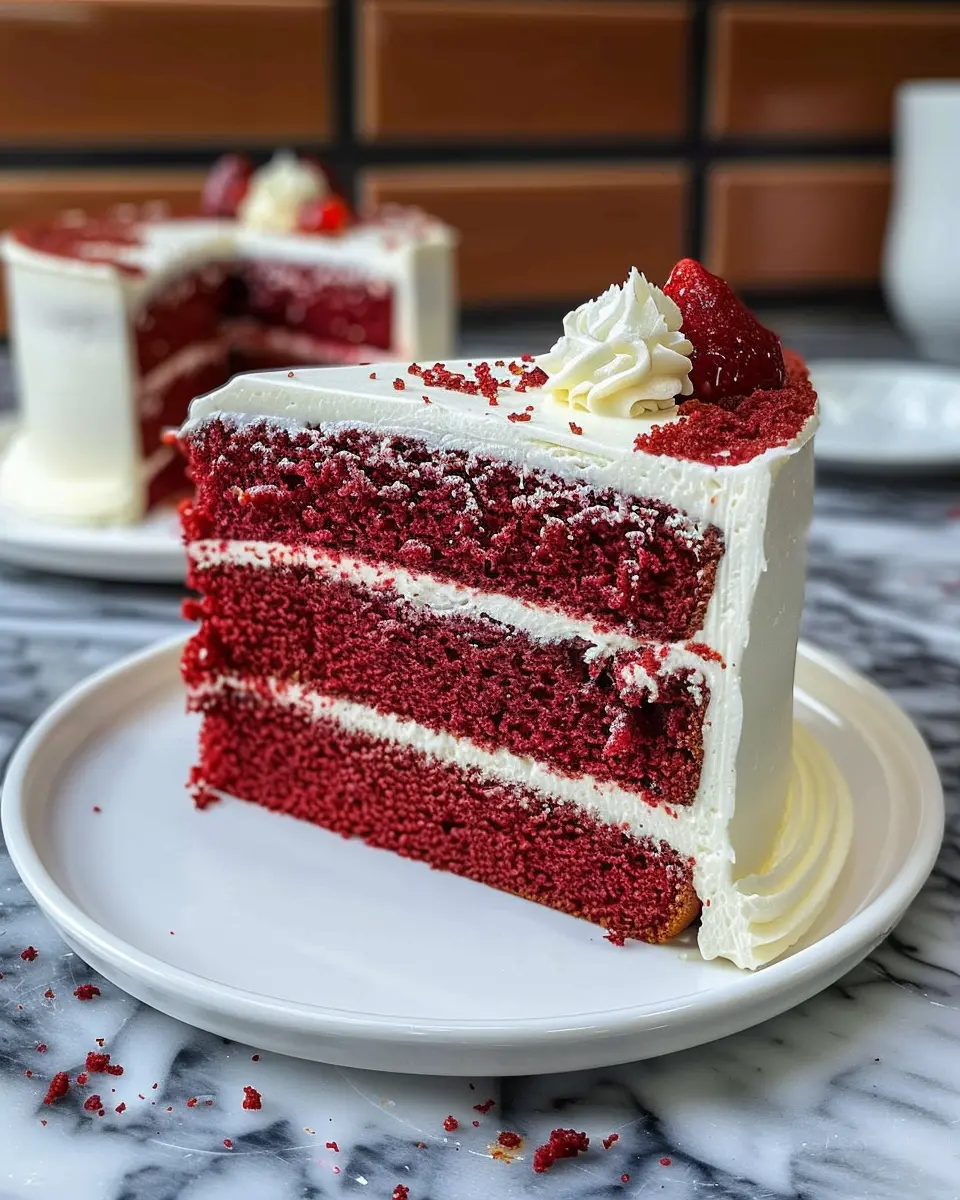
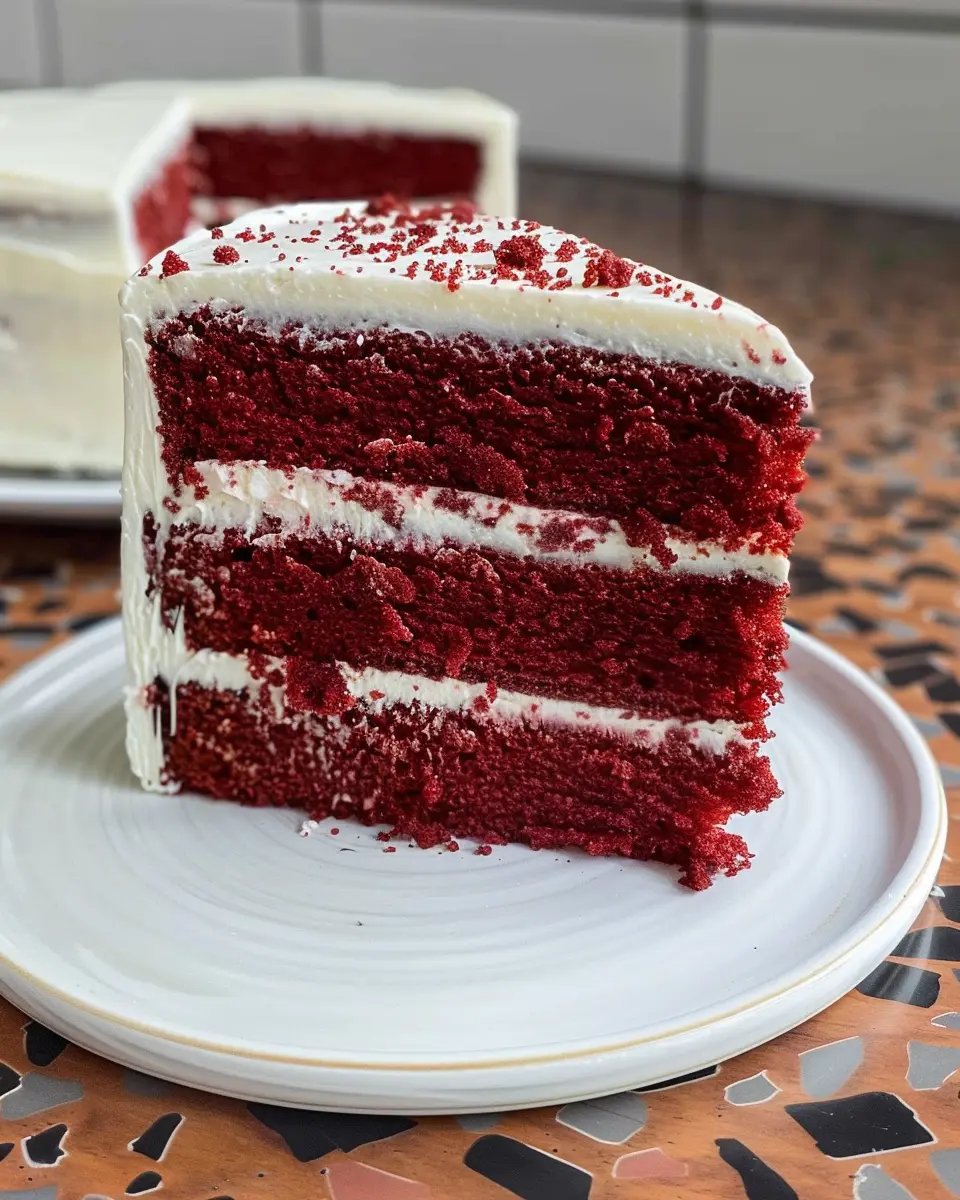
There’s something undeniably captivating about Red Velvet Cake. Its striking, velvety crimson hue draws the eye, while its balanced flavors of cocoa and vanilla beckon the palate. This cake is not just a treat; it’s a celebration. Often gracing weddings, birthdays, and holiday gatherings, it has secured a special place in our hearts—and on our dessert tables.
A brief history of Red Velvet Cake
The origins of Red Velvet Cake can be traced back to the early 20th century. Some say it gained popularity during the Great Depression, when cooks used cocoa powder and acidic ingredients like buttermilk and vinegar to elevate the flavor and color of their desserts. Interestingly, the cake became a favorite in Canada, where a version known as “Waldorf-Astoria Cake” was served in the iconic Waldorf Hotel (check out the Waldorf Astoria history for more insights).
The visible shift to deep red may have been a surprise benefit from the interaction between the cocoa and acidic elements, creating a beautiful hue that captivated bakers. Through the years, Red Velvet Cake has evolved, now featuring cream cheese or buttercream frosting—which adds a delightful tang that harmonizes with the cake’s pleasant sweetness.
What makes it different from other cakes?
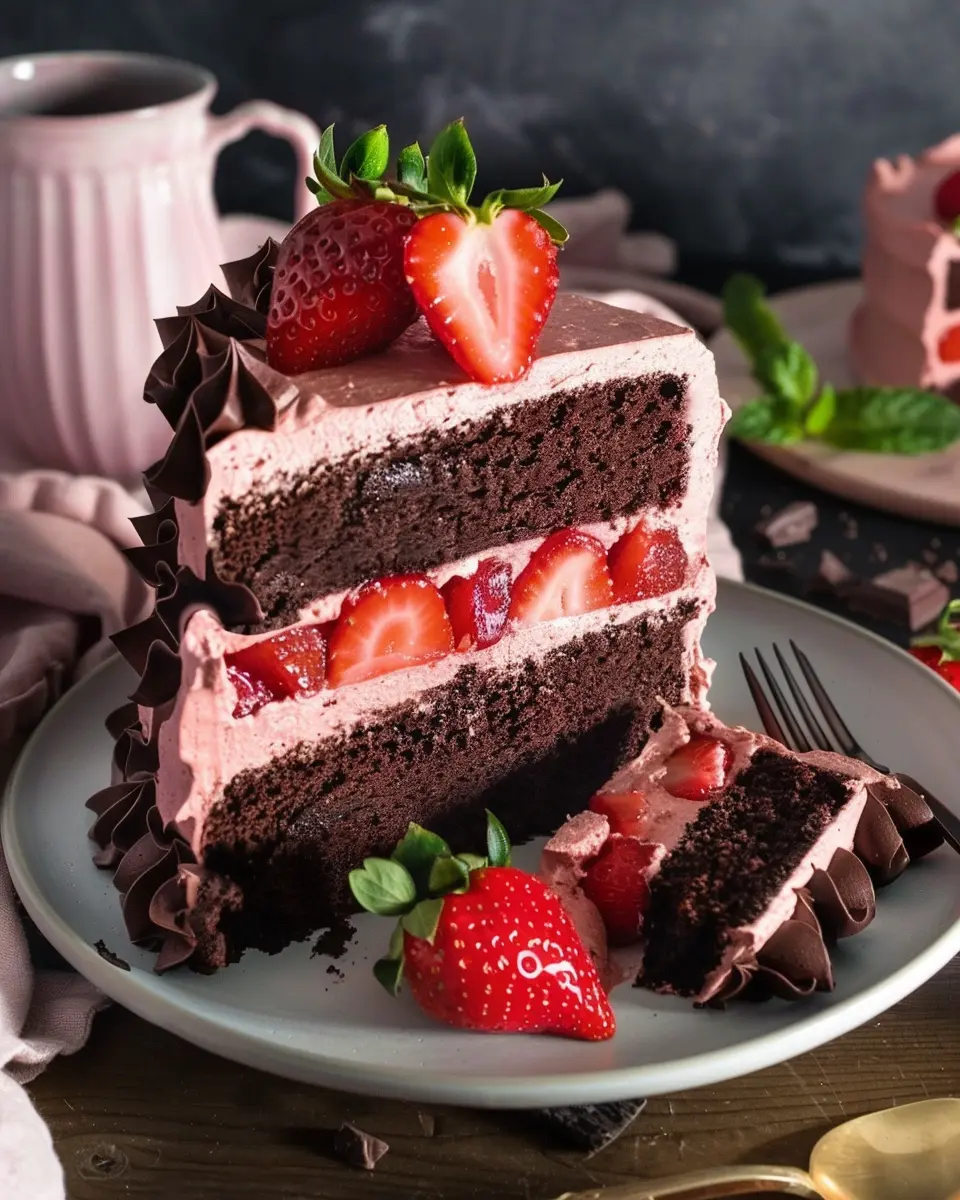
So, what truly sets Red Velvet Cake apart from your average chocolate or vanilla cake? For starters, it has a unique flavor profile. The subtle cocoa paired with the tangy frosting creates a delightful balance that many cakes lack. Its signature texture is also worth mentioning; it’s moist and tender, making it almost melt-in-your-mouth.
In addition, the vibrancy of its color, combined with contrasting white frosting, creates a visual appeal that’s hard to rival. Whether served at a casual gathering or a formal occasion, Red Velvet Cake doesn’t just taste good—it looks stunning too!
So why not bring a slice of this beautiful cake into your next gathering? Your friends will thank you!

Ingredients for Red Velvet Cake
When you’re ready to bake a delicious Red Velvet Cake, having the right ingredients on hand is essential. Here’s a quick rundown of what you’ll need to achieve that perfect, velvety texture and signature flavor.
Essential ingredients for the cake
To create a scrumptious Red Velvet Cake, gather the following ingredients:
- All-purpose flour: The foundation for your cake.
- Granulated sugar: Sweetness that balances the cake’s rich flavors.
- Cocoa powder: Just a hint adds depth without overpowering the red hue.
- Baking soda: To give your cake a nice rise.
- Buttermilk: This is key for moisture and that tangy flavor.
- Vegetable oil: For a soft and tender crumb.
- Eggs: They provide structure and richness.
- Red food coloring: The star of the show; it gives the distinct color.
- Vanilla extract: A warm, aromatic flavor enhancer.
Did you know that the original Red Velvet Cake was created decades ago in the Southern United States, and its iconic color comes from a chemical reaction between cocoa powder and acidic ingredients?
Key ingredients for the cream cheese frosting
No Red Velvet Cake is complete without a luscious cream cheese frosting. Here’s what you’ll need:
- Cream cheese: The main ingredient, providing a rich, tangy flavor.
- Unsalted butter: For creaminess and to help stabilize the frosting.
- Powdered sugar: This sweetens and gives the frosting that smooth texture.
- Vanilla extract: To tie all the flavors together.
If you’re looking for more inspiration on frosting techniques, check out this helpful guide on Serious Eats.
With these ingredients in hand, you’re well on your way to impressing friends and family with a stunning Red Velvet Cake that’s sure to delight!
Preparing Red Velvet Cake
Creating a decadent Red Velvet Cake at home can feel like a daunting task, but with the right steps, it becomes a joyful and rewarding experience. Let’s walk through the process together.
Gather all your ingredients
The first step to baking a delightful Red Velvet Cake is to gather all your ingredients. You want to ensure you have everything at your fingertips before diving into this mouth-watering project. Here’s what you’ll need:
- 2 ½ cups all-purpose flour
- 1 ½ cups granulated sugar
- 1 cup vegetable oil
- 1 cup buttermilk
- 3 large eggs
- 2 tablespoons cocoa powder
- 1 tablespoon red food coloring
- 1 teaspoon vanilla extract
- 1 teaspoon salt
- 1 teaspoon baking soda
- 1 tablespoon white vinegar
Once you have everything laid out, you’ll feel more organized and ready to bring this delicious cake to life!
Preheat your oven and prep the cake tins
Next up, preheat your oven to 350°F (175°C). As it warms up, take a moment to prepare your cake tins. Greasing them with butter or using non-stick spray is essential to ensure your cake layers slide out smoothly. For this recipe, two 9-inch round cake pans work perfectly. You might also want to line the bottoms with parchment paper for an added layer of assurance.
Creaming the butter, oil, and sugar
In a large mixing bowl, start by creaming together your melted butter, vegetable oil, and granulated sugar. This mixture should become light and fluffy, which generally takes about 3-5 minutes with a hand mixer. Not only does this step create a delightful texture, but it also helps develop the flavors. It’s one of those processes that can feel a bit magical!
Mixing in the eggs, buttermilk, and food coloring
Now, it’s time to add the eggs, buttermilk, and red food coloring to your creamed mixture. Dare I say, this is where the cake really starts to turn that lovely hue we all adore. Mix well until fully combined. A trick here is to add the food coloring gradually; you can always add more until you achieve your desired shade of red!
Combining the dry ingredients
In a separate bowl, whisk together your all-purpose flour, cocoa powder, and salt. Breaking up any lumps is essential here to ensure everything combines evenly. Slowly add this mixture to your wet ingredients, stirring gently until just combined. Remember, overmixing can lead to a tough cake – we want delicate layers!
Activating the baking soda with vinegar
One of the unique elements of Red Velvet Cake is the reaction between baking soda and vinegar. In a small bowl, combine the baking soda and white vinegar, and watch the magic happen—it should fizz up quite a bit! Immediately fold this bubbly mixture into your cake batter. This step adds a delightful lift to the cake.
Baking the cake layers
Pour your batter evenly into the prepared cake pans and bake for 25-30 minutes, or until a toothpick comes out clean. The aroma wafting through your kitchen during baking will be irresistible! Be sure to let the cakes cool in their pans for about 10 minutes, then transfer them to wire racks to cool completely.
Making the cream cheese frosting
No Red Velvet Cake would be complete without its cream cheese frosting! While the layers are cooling, whip together:
- 8 oz cream cheese (softened)
- ½ cup unsalted butter (softened)
- 4 cups powdered sugar
- 1 teaspoon vanilla extract
Beat until smooth and creamy. If you want a bit more tang, add a touch of lemon juice!
Assembling the cake
Once the cake layers are cool, it’s time to assemble your masterpiece. Place one layer on a serving plate, spread a generous amount of cream cheese frosting on top, then gently place the second layer on top. Frost the top and sides of the cake, and feel free to get creative with any decorations that bring you joy!
With these steps, your Red Velvet Cake will not only be a feast for the eyes but also a delectable treat for your taste buds. Happy baking, and enjoy every slice!

Variations on Red Velvet Cake
Red Velvet Cake is not just a dessert; it’s a canvas for creativity! If you’re looking to mix things up a bit, here are some delightful variations that can take your cake experience to the next level.
Red Velvet Cupcakes
Why not transform your classic Red Velvet Cake into cupcakes? These little treats are perfect for parties or when you’re craving a single serving. Use the same batter, but pour it into cupcake liners and bake for about 18-20 minutes. Top them with a fluffy cream cheese frosting, and you’ll have a bite-sized version of this indulgent dessert. You might even enjoy stuffing them with a dollop of cream cheese in the center for an extra surprise!
Red Velvet with Chocolate Chips
For those who crave a bit of extra sweetness, consider adding chocolate chips to your cake batter. The rich, smooth chocolate complements the slightly tangy flavor of red velvet beautifully. Just fold in a cup of semi-sweet chips right before pouring into your cake pan. This creates a perfect mix of flavors, making every bite an exciting discovery!
Gluten-Free Red Velvet Alternatives
If you’re following a gluten-free diet, you can still enjoy the joy of Red Velvet Cake. There are amazing gluten-free flours available, such as almond flour or a gluten-free all-purpose blend. Check out resources like the Gluten Intolerance Group for more tips on substituting ingredients. With the right flour and a few adjustments, you’ll create a cake that’s just as moist and flavorful without the gluten!
These variations showcase how adaptable the classic Red Velvet Cake can be. Have you tried any of these? What’s your favorite twist on a beloved dessert?
Baking tips for Red Velvet Cake
Importance of using room temperature ingredients
When preparing your Red Velvet Cake, it’s essential to use room temperature ingredients. This simple step can make all the difference! Ingredients like butter and eggs blend more easily, resulting in a smoother batter. Plus, room temperature items help create that fluffy texture we all love in cake. If you’re short on time, you can quickly bring eggs to room temperature by placing them in a bowl of warm water for about 10 minutes.
Tips for color intensity and flavor
To ensure your Red Velvet Cake has that gorgeous color and rich flavor, consider the following:
- Use high-quality cocoa powder: Not all cocoa powders are created equal. Opt for a Dutch-processed variety for a deeper color and taste.
- Don’t skimp on the food coloring: The classic bright red color comes from a good amount of red food coloring. If you’re hesitant about using too much, remember it’s the signature feature of this cake!
- Add a touch of vinegar: Mixing vinegar with baking soda boosts the red color and enhances the cake’s texture. It might sound unusual, but it works wonders!
For a deep dive into ingredient tips, consider checking out The Kitchn’s ingredient guide. With these tips in hand, your Red Velvet Cake is sure to impress!
Serving suggestions for Red Velvet Cake
Pairing with coffee or tea
One of the simplest yet most delightful ways to enjoy your Red Velvet Cake is by pairing it with a warm cup of coffee or tea. The cake’s creamy frosting complements the rich flavors of a well-brewed coffee, while a soothing cup of herbal tea balances the sweetness perfectly. For instance, consider a dark roast coffee or a light, floral tea like chamomile. Not only does this enhance the flavors, but it also creates a cozy atmosphere, perfect for a casual afternoon gathering or a well-deserved treat after a long day.
Creative serving ideas for celebrations
When it comes to celebrating special occasions, let your Red Velvet Cake shine!
- Layered Delight: Impress your guests by serving individual cake layers topped with whipped cream and fresh berries. This adds a whimsical touch and creates beautiful presentations.
- Cake Pops: Transform leftovers into fun cake pops. Dipped in white chocolate, these bite-sized treats are perfect for those festive gatherings.
- Ice Cream Pairing: Serve with scoops of vanilla or cream cheese ice cream for a delicious contrast in temperature and texture.
For more inspiration, check out some creative serving ideas at Food Network or explore baking tips from Serious Eats. With these suggestions, you’ll make every celebration memorable with your Red Velvet Cake!
Time breakdown for Red Velvet Cake
Preparation time
The first step to a delightful Red Velvet Cake is the prep time, which usually takes about 30 minutes. During this time, you’ll gather your ingredients, preheat your oven, and prepare your cake pans. Make sure you have everything at hand for a smooth baking experience!
Baking time
Once you’re all set to go, baking the cakes typically takes 25 to 30 minutes. Keep an eye on them, as the last few minutes can make all the difference between perfect and overbaked.
Cooling and assembling time
After baking, allow the cakes to cool for about 30 minutes before moving on to frosting and assembling. This cooling period is essential to ensure your Red Velvet Cake doesn’t melt your frosting!
Total time
In total, you’re looking at around 1.5 to 2 hours for the complete process. So, grab your favorite playlist and get ready for a delightful afternoon creating a delicious treat. For some helpful tips on baking times, check out resources like King Arthur Baking. Happy baking!
Nutritional facts for Red Velvet Cake
Calories per serving
When indulging in a slice of Red Velvet Cake, you might be curious about its caloric content. A standard serving contains approximately 350-400 calories, depending on the recipe and portion size. It’s a delightful treat, but it’s essential to enjoy it in moderation.
Key nutritional benefits
Surprisingly, Red Velvet Cake offers more than just a sweet flavor. Here are some of its nutritional highlights:
- Antioxidants: The cocoa powder in the cake provides beneficial antioxidants that can help combat oxidative stress in the body.
- Calcium and Iron: The buttermilk and eggs used in the recipe add calcium and iron to your diet, contributing to bone health and improved blood circulation.
- Mood-Boosting Ingredients: Who can resist cake? The sugar content can trigger the release of serotonin, the feel-good hormone, making Red Velvet Cake a great way to lift your spirits.
Next time you’re indulging in this classic dessert, remember that it can fit into a balanced lifestyle. For more about dessert choices and their health impacts, you might enjoy exploring this article on dessert health to learn how to enjoy your favorites more mindfully!
FAQs about Red Velvet Cake
Can I make Red Velvet Cake ahead of time?
Absolutely! Red Velvet Cake can be made ahead of time, which is great if you want to manage your time before a big event. You can bake the layers a day or two in advance. Just ensure they’re fully cooled, wrap them tightly in plastic wrap or foil, and store them in the refrigerator or freezer. If you freeze them, let them thaw in the fridge overnight before frosting. This can actually enhance the flavor, making your cake even more delicious!
What can I use instead of buttermilk?
If you’re out of buttermilk, no worries! You can easily substitute it by mixing one cup of milk with one tablespoon of lemon juice or vinegar. Let it sit for about five minutes until it thickens slightly. This DIY version mimics the acidity of buttermilk, ensuring your Red Velvet Cake rises beautifully. Alternatively, you could use yogurt or sour cream thinned with a little milk, which works just as well!
How do I store leftover cake?
To keep your Red Velvet Cake fresh and moist, cover it with plastic wrap or store it in an airtight container. If you have a frosted cake, it’s best to chill it in the fridge to preserve the frosting’s texture. Enjoy your cake within 3-4 days for the best flavors, but if you want to store it longer, a freezer is your friend! Just slice it, wrap pieces individually, and enjoy any time you have a craving. The cake can last up to three months in the freezer.
Feel free to check out resources like Food Network for more tips on cake storage!
Conclusion on Red Velvet Cake
As you dive into the world of baking, embracing homemade delights like Red Velvet Cake over fast food not only brings joy but also delicious flavors. There’s a certain magic in creating your own cakes—from measuring the ingredients to the final frosting touch. This hands-on experience fosters creativity and provides a satisfying outlet for stress. Plus, you can control the quality of ingredients, ensuring your dessert is both tasty and healthier. So, the next time you’re contemplating a sweet treat, remember the joy of whipping up your own enchanting Red Velvet Cake. It’s a choice that celebrates moments, flavors, and your culinary skills.
For more insights on baking, check out the articles on Bon Appétit and Sally’s Baking Addiction.
PrintRed Velvet Cake: The Best Indulgent Treat for Any Occasion

A delicious and visually stunning dessert that is perfect for celebrations, Red Velvet Cake combines rich cocoa flavor with a vibrant red color.
- Prep Time: 20 minutes
- Cook Time: 30 minutes
- Total Time: 50 minutes
- Yield: 12 servings
- Category: Dessert
- Method: baking
- Cuisine: American
- Diet: vegetarian
Ingredients
- 2 1/2 cups all-purpose flour
- 1 1/2 cups granulated sugar
- 1 teaspoon baking soda
- 1 teaspoon salt
- 1 teaspoon cocoa powder
- 1 1/2 cups vegetable oil
- 1 cup buttermilk
- 2 large eggs
- 2 tablespoons red food coloring
- 1 teaspoon vanilla extract
- 1 teaspoon white vinegar
Instructions
- Preheat the oven to 350°F (175°C) and grease two 9-inch round cake pans.
- In a large bowl, sift together the flour, sugar, baking soda, salt, and cocoa powder.
- In another bowl, mix the oil, buttermilk, eggs, food coloring, vanilla, and vinegar.
- Combine the wet and dry ingredients, and mix until smooth.
- Divide the batter evenly between the prepared pans.
- Bake for 25 to 30 minutes or until a toothpick comes out clean.
- Let the cakes cool in the pans for 10 minutes, then remove to wire racks to cool completely.
- Frost with cream cheese icing once cooled.
Notes
- For best results, use room temperature ingredients.
- Store leftover cake in an airtight container for up to 3 days.
Nutrition
- Serving Size: 1 slice
- Calories: 350
- Sugar: 25g
- Sodium: 150mg
- Fat: 15g
- Saturated Fat: 3g
- Unsaturated Fat: 10g
- Trans Fat: 0g
- Carbohydrates: 45g
- Fiber: 1g
- Protein: 4g
- Cholesterol: 40mg